08 Mar Shoot the Sky! How to capture the Aurora Borealis – The Joy Trip Project

There are few natural phenomena more mysterious or spectacular than the northern lights. This unique astrological event also called the Aurora Borealis occurs when energy charged particles smack into atoms high up in the thermosphere. Caused primarily by solar flares cast off by the sun the Aurora Borealis creates a sky-scape display of pulsating light that is magical to watch. And tonight with decent camera equipment and some good advise amateur photographers as well as pros could take advantage of a rare northern lights opportunity.
Today March 8, 2012 scientists predict the biggest solar storm in five years. With waves of solar wind packed with charged particles bombarding the Earth tonight may offer a good chance to capture the Aurora Borealis on film or digital medium. Photo instructor and nature photographer Bryan Hansel says conditions are excellent.
“We’re currently experiencing a storm-level geomagnetic activity, and if it keeps up, it’s strong enough to be seen in the upper Midwest,” Hansel wrote in an exchange on Facebook. “If the storm intensity increases, the northern lights could reach further south.”
During this event photographers in warmer climates just might get the shot of their dreams. But you have to know where to look for the best sighting.
“The best place to see them is outside of town and far away from city lights,” Hansel said. “The full moon will wash the colors out slightly, so it’s important to get away from any artificial lighting that could also wash out the colors. I’d start checking the northern sky about 10pm and keep looking until 2am. With strong storms, I’ve seen them as early as six in the evening in northern Minnesota.”
Cloud cover from recent storms might pose an obstructed view. Add to that a full moon and you’ve got a unique situation for photographers.
“The light from the moon helps illuminate the foreground, so it’s easy to capture extra detail on the ground,” Hansel said. “On darker nights, the ground often ends up black when photographing the northern lights.”
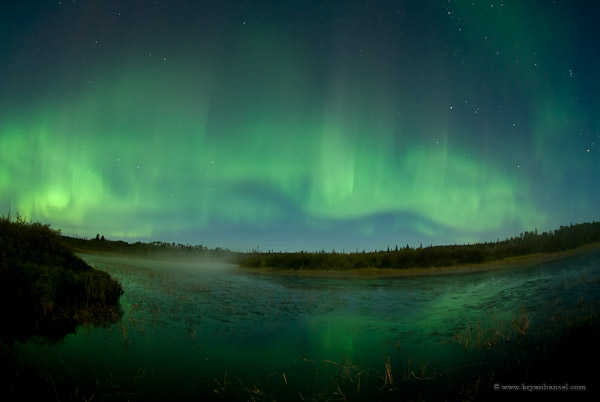
In the photograph above you can see detail in the river only because it was taken during a full moon. With a great deal of experience shooting the northern lights Hansel has a few tips to improve your odds of getting that wonderful shot.
1. Use a sturdy tripod to hold your camera during the picture, the sturdier the better. If you’re buying a tripod just to capture the northern lights, get a one with a ball head. When taking the picture, don’t extend the center post, because it can cause the camera to sway, which will make your pictures less sharp.
2. Use a shutter release cord to trip the shutter or set you timer for 2 seconds and shoot all the images with the timer.
3. Start with an ISO of 400. You’ll vary this based on how bright the northern lights are.
4. Select a wide-angle lens, especially if the event is directly overhead.
5. Put your camera in manual mode and set the aperture at f/4 or f/5.6 and the shutter speed at 30 seconds. With a wide angle lens an aperture of f/4 to f/5.6 will give you enough depth of field to make it appear as if the foreground and the background are both in focus.
6. Manually focus the lens, so that something on earth is in focus. This might be trees, or whatever you put in the foreground. To help, you can have a friend with a flashlight walk out to what you want in focus and point the flashlight back at you. This makes it easy to focus. Alternatively, take a picture and then check the LCD for focus.
7. Take a picture. If it’s too dark, open your aperture to f/4, or increase the ISO to 800. If it’s too bright, reduce your shutter speed to 15 seconds. Take another picture and repeat until you have the exposure that you like. Ideally, a shutter speed in the 2 to 8 seconds really captures the structure in the northern lights. Longer shutter speeds blur the structure into a green glow.
8. Move around and change the foregrounds and background, so you come home with a bunch of different photos.

Bryan Hansel
You can learn the finer points of nature photography during one of Bryan Hansel’s fall photo workshops. For details visit BryanHansel.com
The Joy Trip Project is made possible with the support of sponsor Patagonia


You must be logged in to post a comment.